How to Build a Low-Cost AIS Receiver Station (DIY Guide to Tracking Ships)
- Team WAKE
- Apr 19, 2025
- 14 min read
Updated: Dec 6, 2025
Ever wondered if you could track ships from your backyard? With a bit of affordable hardware and know-how, you can capture live Automatic Identification System (AIS) signals from vessels and monitor maritime traffic in real time. AIS is the system ships use to broadcast their identity, GPS position, course, and more to improve safety and avoid collisions. Enthusiasts around the world have built home AIS receiver stations to contribute data to global tracking networks. Now, with projects like MastChain, the world’s first blockchain-based AIS network, you can even earn token rewards for sharing. This guide will show you how to design, build, and operate a low-cost AIS receiver station, emphasizing easy setup and budget-friendly components. Whether you’re a radio hobbyist, an open-source enthusiast, or a maritime professional, read on to learn how to get started.
What is AIS and Why Build Your Own Station?

AIS Overview
The Automatic Identification System (AIS) is a VHF radio-based system that most large ships are legally required to use to broadcast their movements. Messages are sent on two dedicated frequencies around 162 MHz, containing static info (vessel name, MMSI), dynamic data (position, speed, course), and voyage data (destination, ETA). Shore stations and satellites receive these signals and aggregate them so that maritime authorities, ports, and online services can monitor vessel traffic. When a ship turns off its AIS, it’s often to hide illicit activity, which shows how crucial AIS is for transparency and safety
Why build a station?
By building your own AIS receiver station, you gain a real-time window into maritime traffic in your area. Hobbyists do it for fun and learning, there’s satisfaction in directly picking up ships’ radio signals and plotting them on a map. You also help improve coverage: community-run AIS stations fill gaps in official networks, making global tracking more complete. Some AIS data services (like MarineTraffic, AISHub, etc.) even reward contributors with stats displays and free premium access to AIS data. With a decentralized network like MastChain, contributors are rewarded with tokens for providing verified data, disrupting the old model where big companies held monopolies on AIS information. In short, a DIY AIS station not only serves your curiosity but can benefit the maritime community and even earn you perks for your contribution.
Components of a DIY AIS Receiver Station
Setting up an AIS receiver station is very similar to other radio receiver projects (like ADS-B aircraft tracking). You’ll need three main components: an antenna tuned to AIS frequencies, a radio receiver (ideally a Software Defined Radio dongle or dedicated AIS receiver), and a computer (like a Raspberry Pi) to run decoding software and upload data. We’ll discuss each in detail, along with tips for low-cost options and quick installation.
Antenna Selection for AIS (162 MHz)
A good antenna is arguably the most important part of your AIS station. AIS signals are in the VHF band (~161.975 and 162.025 MHz), so you’ll need an antenna tuned for around 162 MHz. Here are some antenna options:
Marine VHF/AIS Antenna: The simplest ready-made option is a marine VHF antenna that covers AIS frequencies. Many VHF marine band antennas (for ship radios) work for AIS since they span 156–163 MHz. You can buy a compact AIS antenna or even a portable one with a suction cup mount for indoor use (some come as a 1/4-wave whip with cable and suction base for quick mounting). These are plug-and-play and optimized for the band.
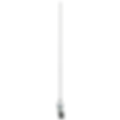
A antenna tuned between 156 to 163MHz DIY Coax Antenna (“Flowerpot” or Dipole): Building your own antenna is a great low-cost alternative. One popular design is the “flower pot” antenna, essentially a collinear coaxial dipole tuned to 162 MH. It involves using lengths of coax cable and PVC pipe to create a high-gain vertical antenna. Even simpler, you could make a basic 1/4-wave ground-plane or dipole antenna using wire or coax (approximately 45 cm elements for 162 MHz). With a few connectors and some DIY spirit, hobbyists have built AIS antennas that perform very well for just a few dollars in parts.

A simple DIY vertical dipole antenna tuned for VHF (around 162 MHz), ideal for AIS reception. Source Antenna Mounting and Height: Regardless of type, placement is key. Mount the antenna as high as feasible with a clear line-of-sight to the water. AIS is line-of-sight radio, meaning signals don’t bend much over the horizon – reception range is typically about 20–40 nautical miles under normal conditions. Elevating your antenna (on a rooftop mast or in an attic by a window) can extend that range. For example, one user with an antenna ~60 meters above sea level was able to pick up ships nearly 50+ nm away (extreme cases even farther in special conditions). Aim to get your antenna above nearby obstructions (buildings, trees) for the best coverage. If you live on the coast or a hill overlooking a port, you’re in an ideal spot. Inland stations near major rivers or lakes can still receive vessels plying those waterways.
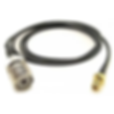
Cabling and Accessories: Use a quality 50-ohm coax cable (like RG-58 for short runs, or low-loss coax for longer runs) to connect the antenna to your receiver. Keep the cable length reasonable to minimize signal loss. Ensure you have the right connectors: many SDR dongles use an SMA connector, so you may need a coax cable with SMA or an adapter. Optionally, in areas with lots of radio interference, an inline band-pass filter for 162 MHz can improve performance by blocking out-of-band noise. In weak signal areas, a low-noise amplifier (LNA/preamplifier) near the antenna can boost AIS signals before they travel down the cable. These extras aren’t always necessary, but they can help if you find your reception range lacking.
Receiver Hardware: SDR Dongles vs Dedicated AIS Receivers
Next, you need a device to actually receive and demodulate the AIS radio signals. There are a few hardware paths you can take, each with pros and cons:
RTL-SDR Dongle (Software-Defined Radio): The most popular choice for hobbyists is a USB RTL-SDR dongle. These little devices (originally TV tuner sticks) can receive a wide range of frequencies, including the AIS band. They are very affordable (≈ $20–$30) and widely available. For AIS, it’s best to use an SDR that has a stable oscillator (look for ones advertised with a TCXO 1 ppm accuracy, which many RTL-SDR V3 units have). The RTL-SDR can simultaneously receive both AIS channels using appropriate software.
Pros: Cheapest option, very versatile (can be repurposed for other RF projects).
Cons: Slightly lower sensitivity than purpose-built AIS receivers, and you rely on software for demodulation which can use some CPU power.

The RTL-SDR V3 is a low-cost USB software-defined radio ideal for AIS reception. Soruce
AIS Receiver HAT or USB Device: Another option is a dedicated AIS receiver module. For example, the dAISy USB receiver and similar Raspberry Pi “HATs” are built specifically to receive AIS messages on both channels. They cost a bit more (around $50–$100) but come pre-tuned and often output ready-to-use AIS data via a serial/USB interface. Users report that devices like dAISy work out-of-the-box with software like OpenCPN, delivering comparable performance to commercial AIS units at a fraction of the cost.
Pros: Simpler setup (no complex driver or calibration issues), potentially better sensitivity since they’re designed for AIS.
Cons: Costlier than an SDR dongle and usually limited to AIS use only.

The dAISy AIS Receiver is a plug-and-play device built specifically for decoding AIS signals via USB. Source
High-End Commercial AIS Base Stations: For commercial operators or serious enthusiasts, there are network AIS receivers (e.g. Digital Yacht AISNet or AMEC AIS receivers) which offer dual-channel AIS reception with ethernet outputs. These devices can run $500–$1000+. They are turnkey solutions often used by marine organizations to feed data 24/7.
Pros: Very reliable, often weatherproof or rack-mount, minimal maintenance.
Cons: Very expensive overkill for a hobby setup. (Many hobbyists achieve nearly the same coverage with the cheaper options above.)

Comparison of AIS Receiver Hardware Options
Option | Approx. Cost | Pros | Cons |
RTL-SDR USB Dongle | $20–$30 | Ultra-cheap; multi-purpose; large community support | Needs software decoding; may need occasional tuning/calibration |
Dedicated AIS Receiver (e.g. dAISy, AIS HAT) | $50–$100 | Plug-and-play for AIS; dual-channel decoding built-in; higher sensitivity | Higher cost; limited to AIS functionality |
Commercial AIS Base | $500+ | Professional grade; robust performance; network-ready (Ethernet) | Very expensive; intended for enterprise use |
As the diagram shows below, even the low-cost setup is quite compact. If you use a Raspberry Pi and an SDR, the whole station can fit in a small box. Many builders use a Raspberry Pi 3 or 4, a USB SDR dongle, and perhaps a USB GPS or Wi-Fi dongle if needed. We’ll focus on the Raspberry Pi approach next.

Computer and Software (Raspberry Pi Setup)
Choosing the computer
The Raspberry Pi is an ideal computer for an AIS receiver station. It’s affordable, runs on only a few watts, and has built-in Wi-Fi (in Pi 3, 4, 5 models) for uploading data. You can use any model from Pi 3 up – even Pi Zero works, though you might need a USB hub for multiple devices. If Pi availability is an issue, any Linux mini-PC or even an old laptop will do, but this guide assumes a Pi for simplicity.
Operating System
Prepare a microSD card (8 GB or larger) for the Pi’s OS. It’s recommended to use the Raspberry Pi OS Lite (a minimal Linux) for headless operation. Using the official Raspberry Pi Imager tool makes this easy: flash the OS and pre-configure Wi-Fi and SSH access so you can operate the Pi without a monitor or keyboard. Once the Pi boots, make sure it’s updated and connected to the internet.
Installing AIS decoder software
There are a few software options to decode AIS signals from the SDR:
AIS-Catcher: A modern, efficient program that supports RTL-SDR and decodes both AIS channels. Many have found success with AIS-catcher due to its ease of use. In one case, after trying various programs, an enthusiast settled on AIS-catcher for reliable decoding. You can download AIS-catcher and follow its instructions to install on Raspberry Pi (usually involves grabbing a pre-built binary or building from source). Once running, it will output raw AIS messages (NMEA sentences).
rtl_ais: A lightweight command-line tool specifically for RTL-SDR. It tunes the dongle to both AIS frequencies and outputs data. This can be an easy start, though it’s older and might not be as fully featured as AIS-catcher.
AIS Dispatcher / Feeders: If your goal is to feed AIS data to online services (or to MastChains), you can use feeder clients. AISDispatcher is one such tool that can take the decoded AIS stream and forward it to multiple services simultaneously. Some all-in-one solutions (like the SARCNET AIS Pi image) come pre-configured to automatically feed certain sites as an anonymous user.
Software setup workflow
Here’s a typical setup flow on a Pi:
Install the SDR drivers (RTL-SDR driver library) and plug in your USB SDR.
Install AIS-catcher or rtl_ais. For example, to use AIS-catcher, you might download its release, then run a command to start it with your SDR device and set output to a UDP port or file.
Verify it’s working: you should see raw AIS messages scrolling by or a count of messages being received. At this stage, you’re picking up live ship signals!
(Optional) Configure data sharing: You can send the AIS data to various endpoints. For hobby use, you might feed sites like MarineTraffic. For Mastchain or other networks, you’d run a specific client that sends your data securely for validation. The Mastchain software (once installed on your Pi) would take the role of collecting AIS messages and verifying them on-chain, earning you MAST tokens.
Don’t be intimidated, many have done this with no prior SDR experience. There are pre-made scripts and images that simplify the process. For instance, the School Amateur Radio Club Network (SARCNET) provides a ready SD card image that has all needed software installed, aiming to make deployment simple. Whether you go manual or use a premade image, minimal coding is required. In most cases it’s about editing a config file with your station ID for a service or running one-line install scripts.
Optimal Location and Installation Tips
Finding the best location
Where you physically place your AIS station matters a lot. Ideally, you want to cover areas with significant ship traffic:
Coastal Areas: If you live near the sea coast, especially by a harbor, bay, or shipping lane, you will receive plenty of AIS messages. Coastal stations are highly valuable because they extend coverage where satellite AIS might miss small vessels. Even if you’re a few miles inland, an elevated antenna can reach ships offshore.
Inland Waterways: Rivers and lakes that handle commercial shipping (for example, the Mississippi River, Great Lakes, European inland waterways) have vessels broadcasting AIS. An AIS receiver station in these areas can feed data on barge and ship movements that few global networks currently capture. If you’re near a busy river lock or a port on a lake, your station could become an important data source.
Urban vs Rural: In urban coastal cities, many ships are already tracked by nearby receivers, but more stations can improve redundancy and local detail. In rural or remote coasts, a single volunteer AIS station might cover hundreds of kilometers of shoreline that were blind before. MastChain specifically aims to deploy nodes in underserved areas to build out the coverage, so your home station might fill a crucial gap if you’re in a less covered region.
Onboard Vessels (with Internet Access): AIS receiver stations don’t have to stay on land, if your vessel has internet access (like Starlink), you can run a mobile AIS node onboard. These roaming nodes are highly valuable to MastChain's decentralized network, especially in remote areas where land coverage is limited. With just a Raspberry Pi, SDR dongle, and basic antenna, sailors and mariners can collect and submit AIS data in real time, helping close global coverage gaps while passively earning MastChain tokens at sea.
Indoor vs Outdoor setup
or the best range, put your antenna outdoors (on a roof mast, pole, or balcony). However, if that’s not feasible, you can still get decent results indoors. For example, suction-cup AIS antennas can stick to an apartment window facing the water. While an indoor setup might have reduced range due to walls and interference, it’s often enough to pick up nearby vessel traffic (perhaps 10-20 nm range). You can always start indoors for simplicity and later move the antenna outside for improvement.
Weatherproofing and maintenance
If installing outside, use a proper weatherproof enclosure for your electronics. Many hobbyists repurpose a small IP65 plastic junction box to house the Raspberry Pi and SDR dongle. Make sure to seal cable entry points to keep moisture out. Place the enclosure in shade or add ventilation if you’re in a hot climate (the Pi and SDR can run warm). Power can be delivered via a single cable if you use Power-over-Ethernet (PoE) splitters or a DC power run; alternatively, some use a 12V DC supply with a 5V USB converter (as shown in the diagram above) to power the Pi remotely. Check the antenna mounting is secure to withstand wind. If you live in lightning-prone areas, consider a lightning arrestor on the antenna line for surge protection.
Power and connectivity
Ensure your station has a reliable power source, especially if it will run 24/7. A small UPS (uninterruptible power supply) can keep a Pi running through brief outages. For data, a steady internet connection (Wi-Fi or wired) is needed to upload AIS data in real time. The data bandwidth is very low (AIS messages are just a few kilobytes per second at most), so even a mobile hotspot or cellular connection can work. In fact, remote AIS stations are often set up with solar power and a GSM modem for completely off-grid operation, something MastChains’s team has prototyped for autonomous nodes (something we will cover in future blog posts). For most home setups though, your home Wi-Fi will do fine.
Testing and optimizing
Once your station is up, take time to test its performance. Use software to visualize what ships you’re receiving and how far away they are. You can log messages and see the MMSI numbers to identify vessels. If you notice you’re not receiving as far as expected, try these tweaks:
Adjust antenna placement (even a few feet higher or a different spot can reduce obstructions).
Check all connectors and cables for losses or faults.
Try adding a filter or LNA as mentioned if you suspect interference or weak signals.
Make sure your SDR gain settings in software are optimized (too low and you miss distant signals, too high and you might get overload; AIS-catcher can automatically optimize this in many cases).
Remember, AIS signals are quite robust in coastal areas, if ships within 20-30 miles aren’t showing up, something in the setup likely needs tuning. Many community forums (like r/AIS on Reddit) can help troubleshoot reception issues.
From Hobbyist to Professional: Use Cases and Benefits
For Hobbyists and SDR Enthusiasts
Building an AIS receiver station is a rewarding project for radio and tech enthusiasts. You’ll learn about VHF radio, antennas, and networking, all while contributing to a global cause. As an AIS feeder, you can:
Visualize Marine Traffic: Hook your data into mapping programs (OpenCPN, OpenSeaMap, etc.) or websites to watch ships move in real time on a chart, knowing the data is coming from your station is a thrill.
Contribute to Open Data: By sharing your AIS feed with networks like AISHub, MarineTraffic, or MastChain, you’re bolstering open maritime information. Enthusiast-run stations have improved safety and transparency by covering areas that were previously dark on the map.
Community Recognition: Many AIS communities acknowledge top contributors. For example, MarineTraffic will show your station on their map with stats like range and message counts. You might even get to see your username or station ID credited for expanding coverage in your region.
Token Rewards: Uniquely, the MastChain network goes a step further by offering cryptocurrency token rewards for contributed data. Instead of just a thank-you or premium account, you earn MastChain tokens when your AIS data is validated. This is an exciting development for hobbyists looking to join the Web3 movement, your DIY station becomes a node in a decentralized network, potentially earning revenue for you over time.
Extend to Other Bands: Once you’ve set up an AIS station, you have the skills to tackle other SDR projects. Many AIS builders also set up ADS-B receivers for aircraft, or weather satellite receivers. The same Raspberry Pi can even run multiple receivers (with multiple dongles or a dual SDR hat) to collect different data streams simultaneously
Overall, as a hobbyist you’ll enjoy not only the hands-on building process but also the engagement with a global community of like-minded radio enthusiasts.
For Commercial Operators and Maritime Professionals
AIS isn’t just for hobbyists; it’s a backbone of maritime operations. If you manage a port, a marina, a shipping fleet, or are involved in maritime logistics, operating your own AIS receiver station can be highly beneficial:
Better Local Awareness: Relying solely on third-party AIS data providers can sometimes introduce delays or gaps. With your own station, you get instant local AIS feeds for the vessels in your vicinity. This real-time data can feed into your VTS (Vessel Traffic Service) system or port management software to enhance decision-making (for example, knowing exactly when a ship enters the harbor mouth).
Data Ownership and Quality: Having your own receiver means you own the raw AIS data and can archive or analyze it as you see fit. Commercial data providers often charge steep fees for historical data access. By logging your station’s feed, you build a valuable dataset of maritime traffic patterns for your area.
Cost Savings: Setting up a DIY station is relatively cheap, a few hundred dollars at most –which is negligible for a commercial entity. It can supplement or even replace a costly AIS service subscription for local coverage. For small ports or marine research institutions, a DIY station provides professional-quality data on a shoestring budget.
Resilience and Redundancy: Even if you have official AIS base stations, adding a couple of low-cost receivers (perhaps at different locations around a port) increases redundancy. In case one system fails, the other can continue providing coverage. Decentralized networks like MastChain also promise more tamper-resistant data sharing, each node’s data is verified by others, which could increase trust in the AIS data feed against spoofing or errors.
Join the Decentralized Network: By contributing your station’s data to MastChain, commercial operators can support the broader goal of democratizing AIS data. Ports and shipowners participating in MastChain help build a more distributed network and in return gain access to a worldwide stream of AIS data without relying on a single provider’s platform. They also earn tokens, which could offset costs and create a passive revenue stream.
Public Relations and Community Impact: There’s a goodwill aspect too, if you’re a commercial operator who shares AIS data openly, it demonstrates commitment to transparency and innovation. Some ports partner with hobbyists or provide sites for AIS receivers as a community engagement effort. MastChain’s vision includes partnering with institutions to deploy nodes in key areas, so this could be an opportunity for collaborative projects between hobbyists and organizations.
Set Sail with Your AIS Station and Join MastChain
Building a low-cost AIS receiver station is a feasible project for anyone with a bit of tech interest, and it’s never been easier. With a modest investment in hardware and an afternoon of setup, you can start receiving live ship data from the airwaves. We covered how to select the right antenna, use a Raspberry Pi and SDR for quick installation, and optimize your station’s location for maximum range. Now it’s time to put it into action.
By launching your own AIS receiver, you’re contributing to a more open and distributed maritime data network. You’ll gain insights into the movements of vessels near you and help cover areas that need better AIS visibility. If you’re a hobbyist, enjoy the learning process and the thrill of tracking ships on your screen. If you’re a commercial user, leverage the data and resiliency that your station provides.
Most importantly, consider joining MastChain’s decentralized AIS data network as the next step. MastChain allows anyone globally to run an AIS node, verify maritime data, and earn rewards for it.